Zyxel ISDN SetupH2>

Interface Overview
Navigation
Configuring for ISDN Connectivity
Troubleshooting Connectivity Problems
Interface Overview
The Zyxel (or the Netgear ISDN Router) uses a text-based menu driven system for the configuration and troubleshooting of the router. It allows for a wide range of options, including NAT, port forwarding, port filtering, secondary dial-up numbers, and other advanced features. In addition, the router provides a detailed debugging and logging system and syslogging to a remote machine.
Navigation
Enter Key
-To navigate between menus, enter the number of the Menu then press Enter.
Arrow Keys
-Press the right and left arrow keys move between items in the navigate configuration screens.
-To undo any changes that you make press the up or down arrow keys.
Space Bar
-Use the space bar to select items that you choose for example, ISDN Switch Type.
Type Over
-Type over existing information, for example the Ethernet IP.
Configuring for Connectivity
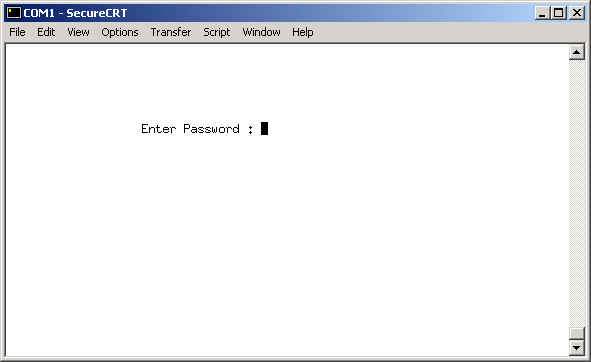
1. Console or Telnet into the router, the default password is 1234.
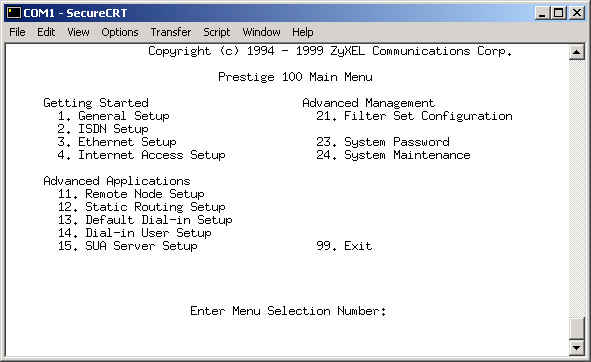
2. The Main Menu provides you with a list of the main categories of configuration and troubleshooting tools available. To access a menu, type the menu number then press enter.
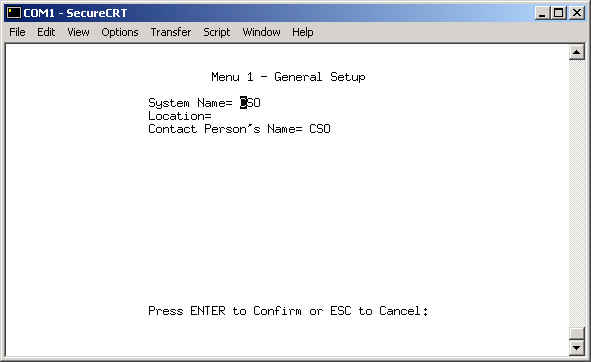
3. In the General Setup screen you can configure optional information such as the name of the router, location, and a contact for that router.
4. Press Enter to confirm or ESC to cancel.
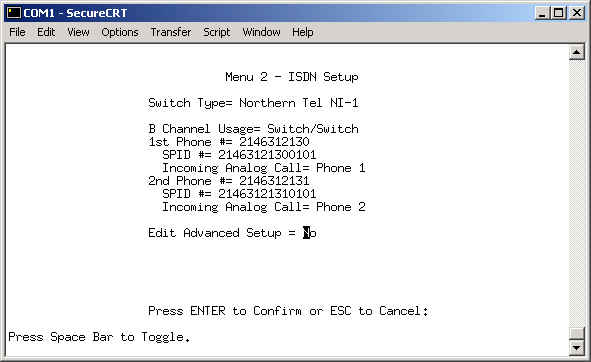
5. Choose the switch type and program your SPIDS.
Note: The Advanced Setup screen is optional for most configurations.
6. Press Enter to confirm or ESC to cancel.
6. You will be prompted to conduct the ISDN Connection Test. Type N to continue.
Note: The test will be conducted in Step 11.
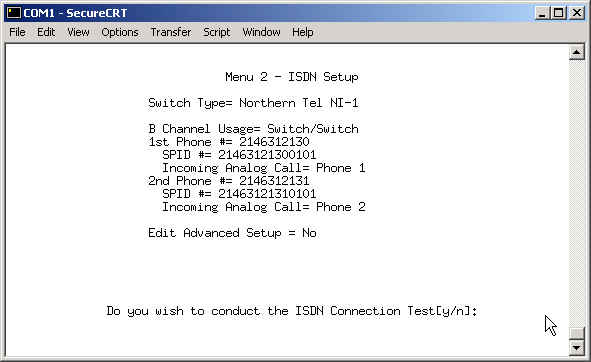
7. The Ethernet Setup screen has 2 sub-menus: General Setup and TCP/IP and DHCP Setup. Select TCP/IP and DHCP Setup (#2).
General Setup- Allows you to choose your Ethernet Interface if the device has any filter sets that you choose to apply to the interfaces.
TCP/IP and DHCP Setup-Allows you to program the Ethernet IP address, Subnet mask, and RIP Direction.
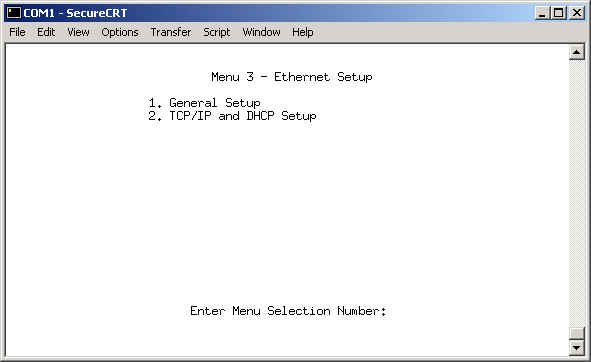
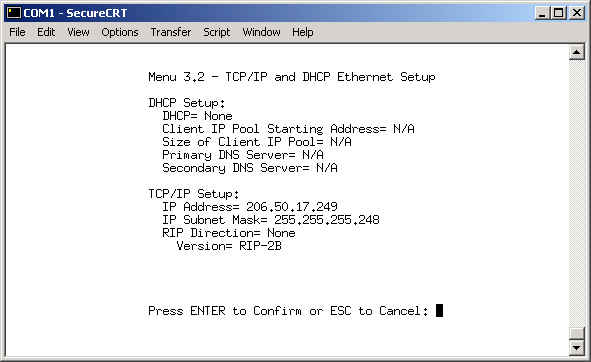
8. Set the DHCP to None in the TCP/IP and DHCP Ethernet screen. Next, program the Ethernet IP address, Subnet Mask, and RIP Direction (None). Then press Enter to confirm or ESC to cancel.
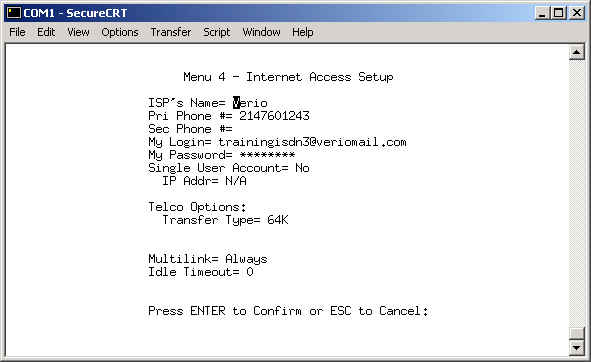
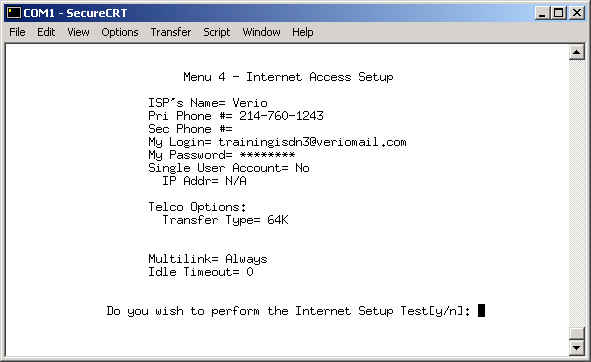
9. The Internet Access Setup screen will allow you to set your ISP information, including the name of the profile, the Primary and Secondary dial-in numbers, the username and password, and whether this is a single dynamic IP account (NAT).
-The Telco Options allow you to choose 64 or 56K.
-Multilink should generally be set to Always if you want to run both B channels.
-Idle Timeout should be set to 0.
10. Press Enter to confirm or ESC to cancel.
11. You will be prompted to perform an Internet Setup Test. Type Y to conduct the test.
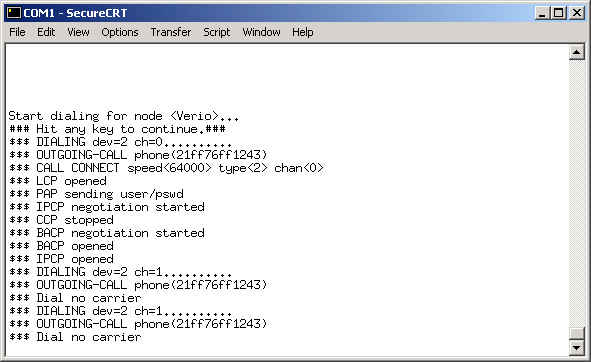
EXAMPLE OF UNSUCCESSFUL TEST
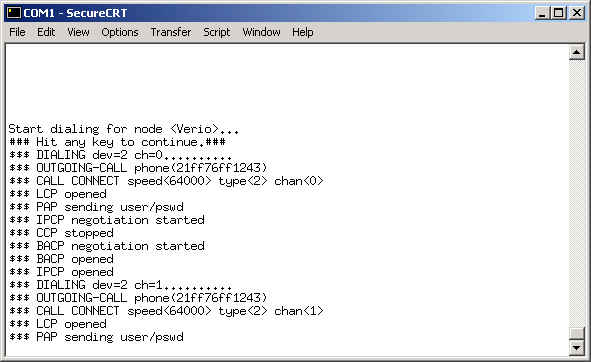
EXAMPLE OF SUCCESSFUL TEST
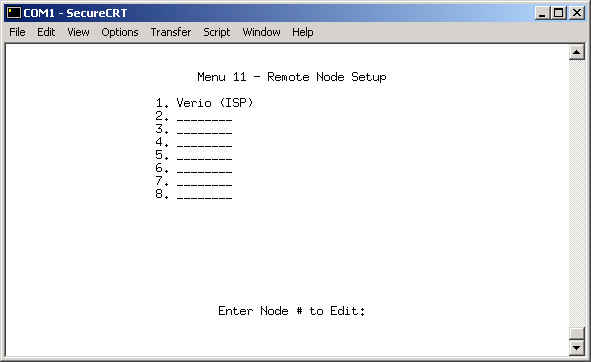
12. In order for the connection to route properly, you need to configure the default gateway. Go to the Remote Node Setup and choose your ISP Connection.
13. Use the arrow keys to set the Remote IP Address.
Note: All other options should be in the default settings.
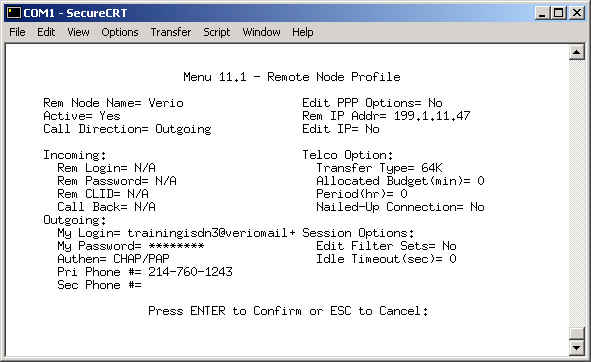
14. You have successfully configured the router. From a workstation on the LAN, try to browse the Internet. This will cause the router to dial out and connect. If for any reason, this does not work, consult the next section for troubleshooting options.
Troubleshooting Connectivity Problems
The System Maintenance screen provides you with System Status, Logging information, Diagnostic Tools, Configuration Management, and Firmware updates.
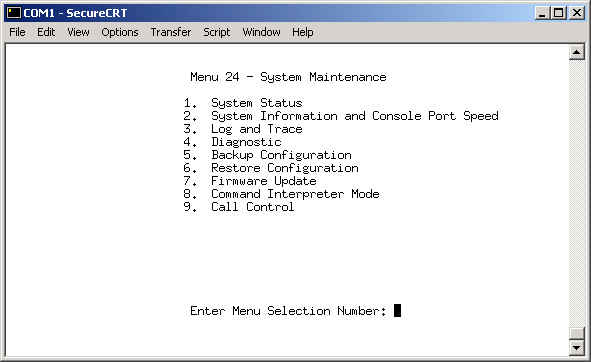
This is the output of the System Maintenance screen. In this example, both B channels have been connected at 64Kbps for 1 Hour and 12 Minutes each. You can also see the Ethernet status and if a computer from the LAN caused the connection to dial out.
The COMMANDS at the bottom allow you to drop either or both B channels and clear the counters for this screen. There is no confirmation message before these commands are executed.
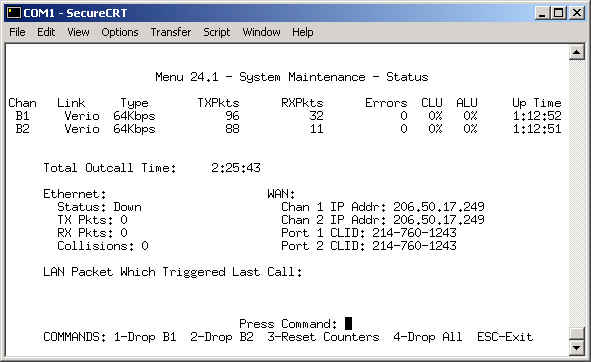
The Log and Trace menu has 2 sub-menus: View Error Log and System and Accounting.
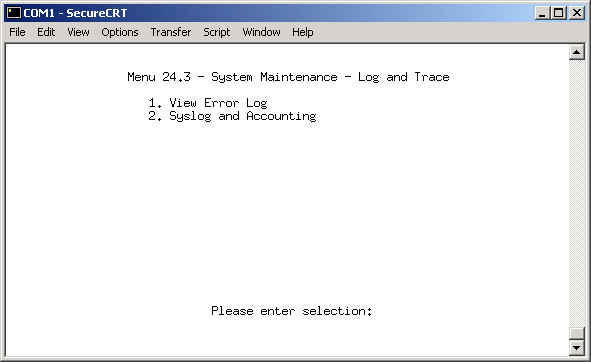
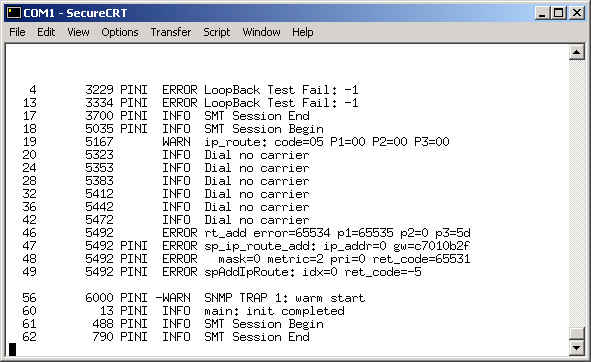
The error logs show that this router failed a loopback test 2 times, had problems dialing out multiple times, and later shows that a connection was established and then disconnected.
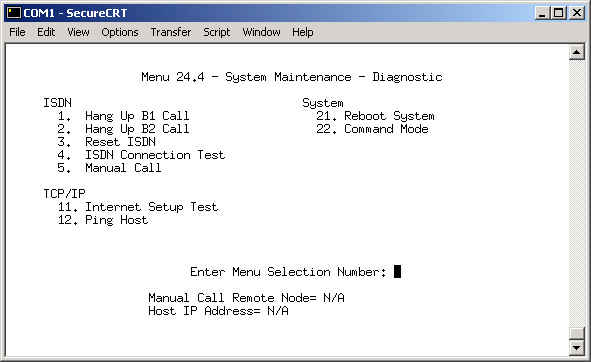
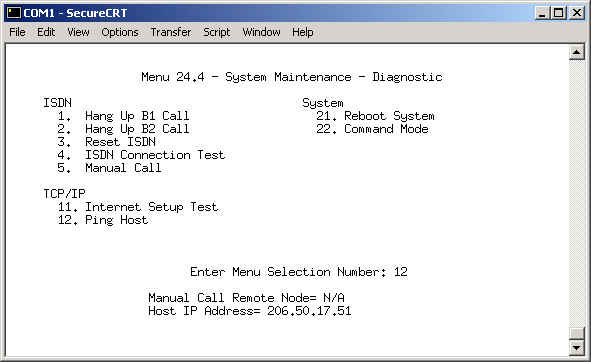
The Diagnostic Menu allows you to reset channels, perform tests, and reset the router.
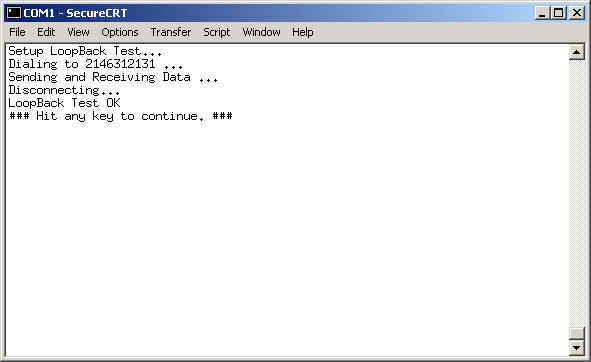
EXAMPLE OF A SUCCESSFUL ISDN Connection Test
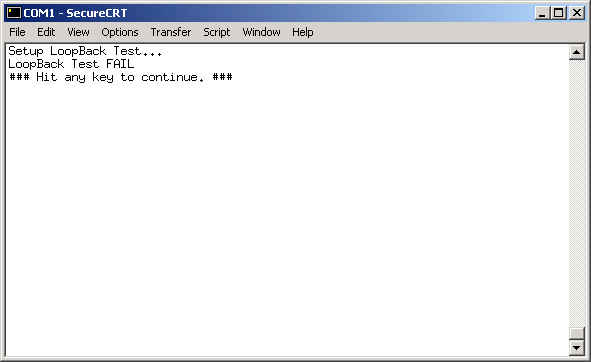
EXAMPLE OF AN UNSUCCESSFUL ISDN Connection Test
Another test that can be run is the Ping test. Enter 12 for the test and then enter the IP of the device that you want to ping. Only IP's can be used in this test.
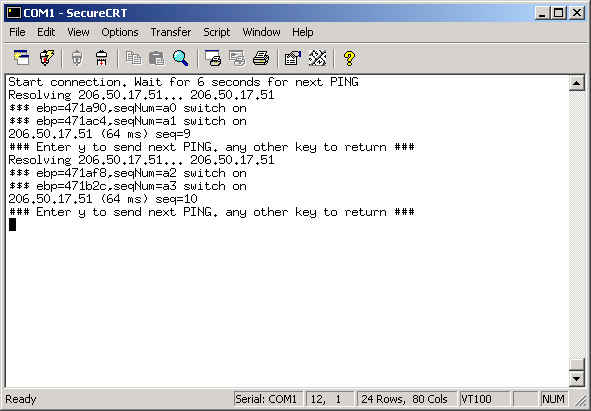
The results are different from other router outputs. Notice how it shows the packet leaving the router and then another line shows the packet returning. Only 2 packets were sent in this example.

Interface Overview
Navigation
Configuring for ISDN Connectivity
Troubleshooting Connectivity Problems
Interface Overview
The Zyxel (or the Netgear ISDN Router) uses a text-based menu driven system for the configuration and troubleshooting of the router. It allows for a wide range of options, including NAT, port forwarding, port filtering, secondary dial-up numbers, and other advanced features. In addition, the router provides a detailed debugging and logging system and syslogging to a remote machine.
Navigation
Enter Key
-To navigate between menus, enter the number of the Menu then press Enter.
Arrow Keys
-Press the right and left arrow keys move between items in the navigate configuration screens.
-To undo any changes that you make press the up or down arrow keys.
Space Bar
-Use the space bar to select items that you choose for example, ISDN Switch Type.
Type Over
-Type over existing information, for example the Ethernet IP.
Configuring for Connectivity
1. Console or Telnet into the router, the default password is 1234.

2. The Main Menu provides you with a list of the main categories of configuration and troubleshooting tools available. To access a menu, type the menu number then press enter.

3. In the General Setup screen you can configure optional information such as the name of the router, location, and a contact for that router.
4. Press Enter to confirm or ESC to cancel.

5. Choose the switch type and program your SPIDS.
Note: The Advanced Setup screen is optional for most configurations.
6. Press Enter to confirm or ESC to cancel.

6. You will be prompted to conduct the ISDN Connection Test. Type N to continue.
Note: The test will be conducted in Step 11.

7. The Ethernet Setup screen has 2 sub-menus: General Setup and TCP/IP and DHCP Setup. Select TCP/IP and DHCP Setup (#2).
General Setup- Allows you to choose your Ethernet Interface if the device has any filter sets that you choose to apply to the interfaces.
TCP/IP and DHCP Setup-Allows you to program the Ethernet IP address, Subnet mask, and RIP Direction.

8. Set the DHCP to None in the TCP/IP and DHCP Ethernet screen. Next, program the Ethernet IP address, Subnet Mask, and RIP Direction (None). Then press Enter to confirm or ESC to cancel.

9. The Internet Access Setup screen will allow you to set your ISP information, including the name of the profile, the Primary and Secondary dial-in numbers, the username and password, and whether this is a single dynamic IP account (NAT).
-The Telco Options allow you to choose 64 or 56K.
-Multilink should generally be set to Always if you want to run both B channels.
-Idle Timeout should be set to 0.
10. Press Enter to confirm or ESC to cancel.

11. You will be prompted to perform an Internet Setup Test. Type Y to conduct the test.

EXAMPLE OF UNSUCCESSFUL TEST

EXAMPLE OF SUCCESSFUL TEST

12. In order for the connection to route properly, you need to configure the default gateway. Go to the Remote Node Setup and choose your ISP Connection.

13. Use the arrow keys to set the Remote IP Address.
Note: All other options should be in the default settings.

14. You have successfully configured the router. From a workstation on the LAN, try to browse the Internet. This will cause the router to dial out and connect. If for any reason, this does not work, consult the next section for troubleshooting options.
Troubleshooting Connectivity Problems
The System Maintenance screen provides you with System Status, Logging information, Diagnostic Tools, Configuration Management, and Firmware updates.

This is the output of the System Maintenance screen. In this example, both B channels have been connected at 64Kbps for 1 Hour and 12 Minutes each. You can also see the Ethernet status and if a computer from the LAN caused the connection to dial out.
The COMMANDS at the bottom allow you to drop either or both B channels and clear the counters for this screen. There is no confirmation message before these commands are executed.

The Log and Trace menu has 2 sub-menus: View Error Log and System and Accounting.

The error logs show that this router failed a loopback test 2 times, had problems dialing out multiple times, and later shows that a connection was established and then disconnected.

The Diagnostic Menu allows you to reset channels, perform tests, and reset the router.

EXAMPLE OF A SUCCESSFUL ISDN Connection Test

EXAMPLE OF AN UNSUCCESSFUL ISDN Connection Test

Another test that can be run is the Ping test. Enter 12 for the test and then enter the IP of the device that you want to ping. Only IP's can be used in this test.

The results are different from other router outputs. Notice how it shows the packet leaving the router and then another line shows the packet returning. Only 2 packets were sent in this example.
