Comiling the Linux Kerenel
These are my notes that I've generated while building and testing kernels on the new Opteron 64bit kernel. I've generalized these to include information for all audiences, but if I missed something, then please contact me and let me know.
- Survey your System
- Acquire Source
- Extract and Patch
- Assign a Unique Name
- Backup .config
- Configure the Kernel
- 2.4.x Kernels
- 2.6.x Kernels
In the 2.4.x kernels, there are 4 main frontends to configuring the kernel: config, oldconfig, menuconfig, and xconfig. You simply choose one of these and type, for example, make menuconfig.
config is the least user-friendly option as it merely presents a series of questions that must be answered sequentially. Alas, if an error is made you must begin the process from the top. Pressing Enter will accept the default entry, which is in upper case.
oldconfig will read the defaults from an existing .config and rewrite necessary links and files. Use this option if you've made minor changes to source files or need to script the rebuild process. Note that oldconfig will only work within the same major version of the kernel. You cannot, for example, use a 2.4.x .config with the 2.6.x kernel.
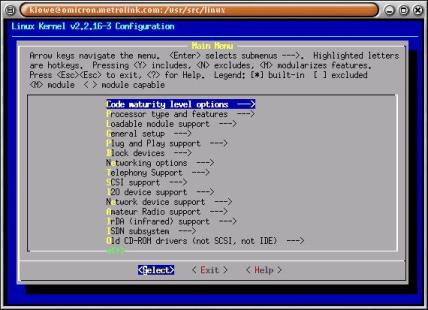
menuconfig is probably the best option if you do not have X-Windows available. It is an ncurses-based front end and looks like the following:
xconfig, as the name suggests, is an X-Windows based frontend. It uses the Tcl/TK libraries to present a nice GUI that is similar in structure to the ncurses config used with the menuconfig. Below is an example screen:

For the support of the most audiences (including myself) I will assume that you are using make menuconfig, but you can use xconfig just as easily.
Once you have made all of your configurations, you can save your settings. By default, it will save as .config in the topmost directory. You can save this here, but I advise the you copy this file after you exit this utility.
In 2.6.x kernels, there are 4 main frontends to configuring the kernel: config, oldconfig, menuconfig, and xconfig. You simply choose one of these and type, for example, make menuconfig.
config is the least user-friendly option as it merely presents a series of questions that must be answered sequentially. Alas, if an error is made you must begin the process from the top. Pressing Enter will accept the default entry, which is in upper case.
oldconfig will read the defaults from an existing .config and rewrite necessary links and files. Use this option if you've made minor changes to source files or need to script the rebuild process. Note that oldconfig will only work within the same major version of the kernel. You cannot, for example, use a 2.4.x .config with the 2.6.x kernel.
menuconfig is probably the best option if you do not have X-Windows available. It is an ncurses-based front end and a screen shot is available in the previous section.
xconfig, as the name suggests, is an X-Windows based frontend. It uses the Tcl/TK libraries to present a nice GUI that is similar in structure to the ncurses config used with the menuconfig. Below is an example screen:

- Build Dependencies
- Build the Kernel
- Build the Modules
- Install
- Reboot and Test
Once you have determined that your hardware and software meet the minimum requirements for the kernel build, we will need to collect more detailed information about the system. This is needed during the configuration process when we decide which hardware will be supported under our new kernel. Among the information we will gather include: Processor, Drive type and Controller (SCSI, IDE), Ethernet devices, Graphics and Sound Cards, USB HUB.
We start by running the /sbin/lspci utility to print information about our hardware:
[root@localhost root]# lspci
00:06.0 PCI bridge: Advanced Micro Devices [AMD] AMD-8111 PCI (rev 07)
00:07.0 ISA bridge: Advanced Micro Devices [AMD] AMD-8111 LPC (rev 05)
00:07.1 IDE interface: Advanced Micro Devices [AMD] AMD-8111 IDE (rev 03)
00:07.2 SMBus: Advanced Micro Devices [AMD] AMD-8111 SMBus 2.0 (rev 02)
00:07.3 Bridge: Advanced Micro Devices [AMD] AMD-8111 ACPI (rev 05)
00:0a.0 PCI bridge: Advanced Micro Devices [AMD] AMD-8131 PCI-X Bridge (rev 12)
00:0a.1 PIC: Advanced Micro Devices [AMD] AMD-8131 PCI-X APIC (rev 01)
00:0b.0 PCI bridge: Advanced Micro Devices [AMD] AMD-8131 PCI-X Bridge (rev 12)
00:0b.1 PIC: Advanced Micro Devices [AMD] AMD-8131 PCI-X APIC (rev 01)
00:18.0 Host bridge: Advanced Micro Devices [AMD] K8 NorthBridge
00:18.1 Host bridge: Advanced Micro Devices [AMD] K8 NorthBridge
00:18.2 Host bridge: Advanced Micro Devices [AMD] K8 NorthBridge
00:18.3 Host bridge: Advanced Micro Devices [AMD] K8 NorthBridge
00:19.0 Host bridge: Advanced Micro Devices [AMD] K8 NorthBridge
00:19.1 Host bridge: Advanced Micro Devices [AMD] K8 NorthBridge
00:19.2 Host bridge: Advanced Micro Devices [AMD] K8 NorthBridge
00:19.3 Host bridge: Advanced Micro Devices [AMD] K8 NorthBridge
02:06.0 SCSI storage controller: Adaptec AIC-7902B U320 (rev 10)
02:06.1 SCSI storage controller: Adaptec AIC-7902B U320 (rev 10)
02:09.0 Ethernet controller: Broadcom Corporation NetXtreme BCM5704 Gigabit Ethernet (rev 03)
02:09.1 Ethernet controller: Broadcom Corporation NetXtreme BCM5704 Gigabit Ethernet (rev 03)
03:00.0 USB Controller: Advanced Micro Devices [AMD] AMD-8111 USB (rev 0b)
03:00.1 USB Controller: Advanced Micro Devices [AMD] AMD-8111 USB (rev 0b)
03:05.0 Unknown mass storage controller: Silicon Image, Inc. (formerly CMD Technology Inc)
Silicon Image SiI 3114 SATARaid Controller (rev 02)
03:06.0 VGA compatible controller: ATI Technologies Inc Rage XL (rev 27)
03:08.0 Ethernet controller: Intel Corp. 82557/8/9 [Ethernet Pro 100] (rev 10)
[root@localhost root]#
Next, we must determine our processor type if not known. Some Linux systems contain a /proc filesystem that allows a user to view raw information about the system. If /proc exists you can issue the following command to get CPU information:
[root@localhost root]# cat /proc/cpuinfo
processor       : 0
vendor_id       : AuthenticAMD
cpu family      : 15
model           : 5
model name      : AMD Opteron(tm) Processor 240
stepping        : 1
cpu MHz         : 1394.311
cache size      : 1024 KB
fpu             : yes
fpu_exception   : yes
cpuid level     : 1
wp              : yes
flags           : fpu vme de pse tsc msr pae mce cx8 apic sep mtrr pge mca cmov
pat pse36 clflush mmx fxsr sse sse2 syscall nx mmxext lm 3dnowext 3dnow
bogomips        : 2736.12
TLB size        : 1088 4K pages
clflush size    : 64
cache_alignment : 64
address sizes   : 40 bits physical, 48 bits virtual
power management: ts ttp

processor       : 1
vendor_id       : AuthenticAMD
cpu family      : 15
model           : 5
model name      : AMD Opteron(tm) Processor 240
stepping        : 1
cpu MHz         : 1394.311
cache size      : 1024 KB
fpu             : yes
fpu_exception   : yes
cpuid level     : 1
wp              : yes
flags           : fpu vme de pse tsc msr pae mce cx8 apic sep mtrr pge mca cmov
pat pse36 clflush mmx fxsr sse sse2 syscall nx mmxext lm 3dnowext 3dnow
bogomips        : 2785.28
TLB size        : 1088 4K pages
clflush size    : 64
cache_alignment : 64
address sizes   : 40 bits physical, 48 bits virtual
power management: ts ttp

[root@localhost root]#
The best place to get the latest source at is http://kernel.org/. Choose the version you would like to use, either in the 2.6 or 2.4 branches and click on the F link on the right side. Save that file to the /usr/src directory on your machine. If you do not have a src directory, then simply create it.
Extract the source by running the following command:
[root@localhost root]# tar -xvjf linux-2.6.6.tar.bz2
If you downloaded any additional patch sets, then you will need to unzip them as follows:
[root@localhost root]# bunzip2 patch-2.6.6-bk5.bz2
[root@localhost root]# ls -l
-rw-r--r--    1 rnejdl  users  1072806 May 18 02:05 patch-2.6.6-bk5
After uncompressing the patches, then you can apply them to the source. Remember to apply them in order if you have more than one.
[root@localhost root]# cd linux-2.6.6
[root@localhost root]# patch -p1 <../patch-2.6.6-bk5
This is completely optional, but if you end up having to make several different revisions of the kernel, then you will find this quite helpful. Inside of the kernel directory is a file called Makefile. You should consider updating the EXTRAVERSION line to include a revision number, such as:
VERSION = 2
PATCHLEVEL = 6
SUBLEVEL = 6
EXTRAVERSION = -1
If you have configured your kernel previously, then you should consider backing up your previous configuration as follows:
[root@localhost root]# cd linux
[root@localhost root]# cp .config config.save
The next step is create all of the necessary include files that the kernel needs to run and compile. If you are compiling a 2.4.x kernel, then run the following:
[root@localhost root]# make dep
[root@localhost root]# make clean
With the 2.6.x kernels, these 2 steps can be skipped.
We are now (finally) ready to start the actual kernel build. At the prompt type:
[root@localhost root]# make bzImage
Although you have finished building the kernel, without all of the modules that the kernel loads and runs, the system will be pretty useless. You need to run the following 2 commands to build and install the modules:
[root@localhost root]# make modules
[root@localhost root]# make modules_install
Between each command, a ton of information will spew across the screen, but for brevity, I've left it off this document.
I am not sure if this works or not on the 2.4.x kernels, but running the following command on a 2.6.x kernel will make the appropriate boot images and update grub as needed to include this kernel.
[root@localhost root]# make install
Simply reboot the system and then from the grub menu, choose the kernel that you built. If all goes well, then you should be up and running with all of your peripherals responding correctly and without any crashes. If, however, something breaks, you still have your prior kernels you can go back to at any time.